How to set up a proxy for Kerio Control

Kerio Control is a great example of adaptive and flexible software, which is also a very reliable tool for solving many problems. Due to its extensive functionality and variety of settings, the program is a tasty morsel for many Internet users. Kerio Control can act both as a router and as a kind of antivirus, and all this under the excellent anonymity of its users. With the help of the program, you can implement the functionality of a firewall, router, reporting, database monitoring, IPS, user authentication, and much more.
In this article, we will analyze the basic functionality of this software, as well as why we need proxies in its operation. We will also analyze which proxies should be selected.
Features of the Kerio Control program:
The program has huge flexibility of settings and will work according to the rules that you set for it, now the program is actively used on Windows, Linux, and MacOS.
- Router.
The program has a lot of routing functionality. You can set a connection limit for a certain time, with selected applications, a specific type of traffic, or url.
- Antivirus.
Built-in IPS protection will help protect your users’ data.
- Traffic control.
Using the traffic control functionality, you can significantly speed up telephony, for example. In addition, the quality of the network connection is greatly improved.
- Data filtering.
You can restrict access to inappropriate content on various websites or applications. Thus, you exclude the option of parasitic traffic and P2P downloads.
- Monitoring.
Kerio supports streaming device control functionality. You can control the device remotely from your PC or mobile phone.
- Reporting.
All the necessary information is presented in a very understandable way. You will have access to information about network usage even for other users.

What proxies to choose for KerioControl?
Initially, you need to understand that only IPv4 and IPv6(HTTP/HTTPS) protocol proxies are suitable.
We strongly do not recommend using public proxies, because the safety of your data is in serious doubt, and some of the functionality simply cannot be realized.
When using private ones, you can be sure that the entire chain of actions will work without threats from outside, because such proxies will only be used by you.
Step-by-step setup algorithm:
Go to the «Proxy Server» section.
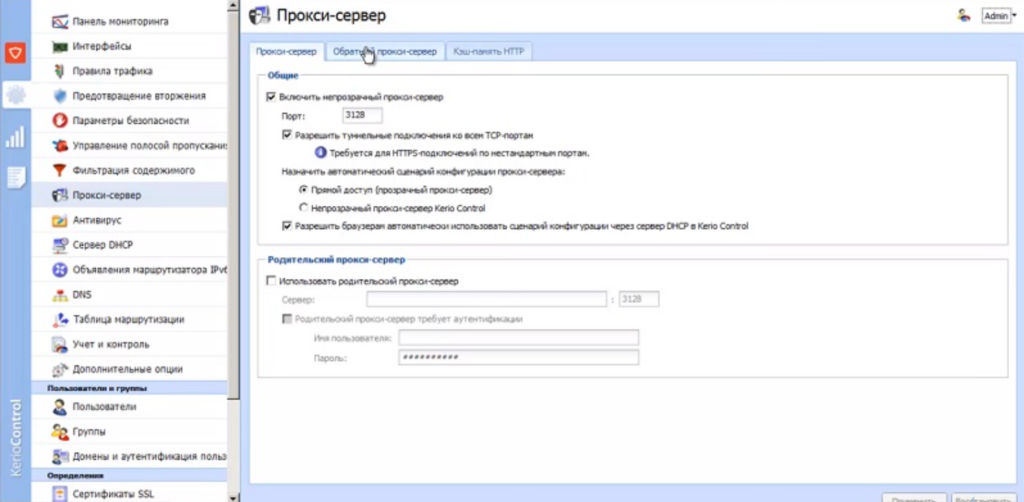
Check the box next to «Use parent proxy».
Specify the proxy IP address and port in the «Server» field.
Enter your username/password in the appropriate fields.
Click Apply.
Ready!