Router as a proxy server. How to set up?
What will proxy settings with a router give us?
A very useful functionality that is underestimated by many. This functionality has many reasons why it should be configured. Basic benefits:
There is an option to directly connect to blocked web resources, several devices at once (Computers, phones, etc.) configured to work with the router.
There is no need to individually configure each of the devices used that are connected to the router. It will be enough to carry out the adjustment once. After setting up a proxy on the router, all users will automatically start using these settings. Thanks to this, the administrator greatly reduces the time spent to achieve the result.
Support for an active proxy connection. Because the proxy connection is constantly maintained, a connection to it will be made automatically every time you try to access the network. At the same time, the contents of all your data and transmitted packages will be under the proper level of protection.
A proxy connection from the router side improves the quality of protecting your data from hacking attempts and their theft. Such a connection is much more effective than intricate passwords, which can be succumbed to experienced crackers. Although a complex password is a prerequisite in any case.
Step-by-step instructions for setting up a proxy server on your router:
Of course, the very first and most understandable point will be the purchase of reliable proxy servers. Without them, any configuration steps will be meaningless, to put it mildly. To work with most services, IPv6 proxy servers are suitable, but in some situations, IPv4 protocols are also possible. There is already more of a question to direct your needs and goals.
First, we need to configure the router itself for connecting to the Internet, according to the instructions. This is done by the representative of the provider itself when connecting your apartments to the Internet. Further examples will be made using the Zyxel Keenetic router settings as an example. In general, for other routers, the principle of action does not change, it is 90% similar to our algorithm.
- 1. We connect to the router. We take a network cable, and connect one end to the computer’s network connector, connecting the other end of the cable to the router in one of the 4 LAN connectors.
The router must be connected to power. After that, we open any of the browsers available to us to enter the settings, in the address bar we need to enter the IP address of the router 192.168.1.1 or 192.168.0.1, after that we go to the desired address by pressing the Enter key. After the actions, we will see a window with data entry for authorization. The admin admin data (login and password) is suitable. In general, these data should be indicated at the bottom of the device or go in the documentation, in the kit, which is less common.
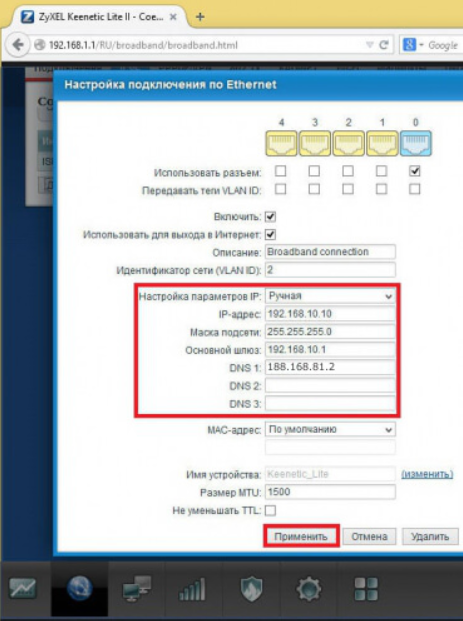
- 2. In the configuration panel, at the bottom there is an icon in the form of a globe. After clicking it, open the IPoE tab. On the page that opens, select ISP Broadband Connection.

- 3. In the network connection settings, you need to “Configure IP settings” to switch to manual mode. After that, enter the necessary data in the IP address, Subnet mask, Default gateway, and DNS1 areas. Upon completion, you need to “apply” all actions by pressing the appropriate button.
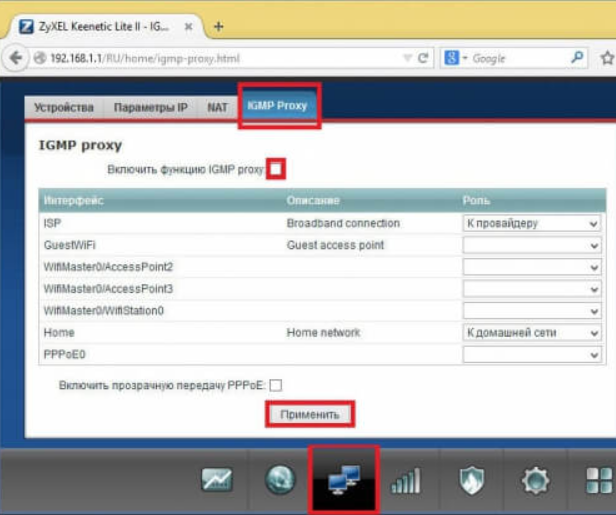
- 4. In the “Home Network” menu section, click on “Computers”. In the “Home Network,” we need to go to the IPMP Proxy tab, and there we already remove the extra, for us, tick. So we will disable this feature.
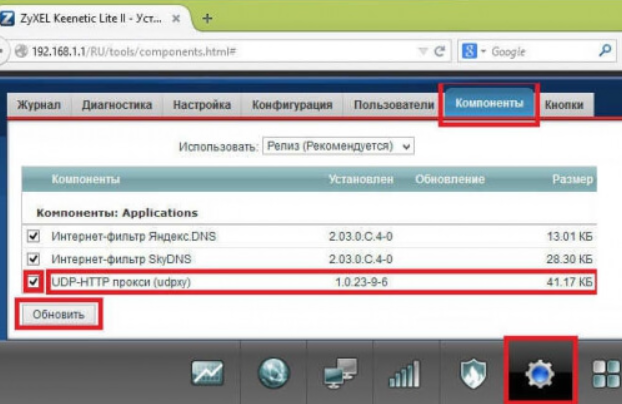
- 5. A gear symbol will be located at the bottom of the “System” panel. Click on this symbol. We select “Components” or “Update”, after that we need to install the Proxy UDP HTTP utility, making the item we need action. When all actions are completed, we press the “Update” button.
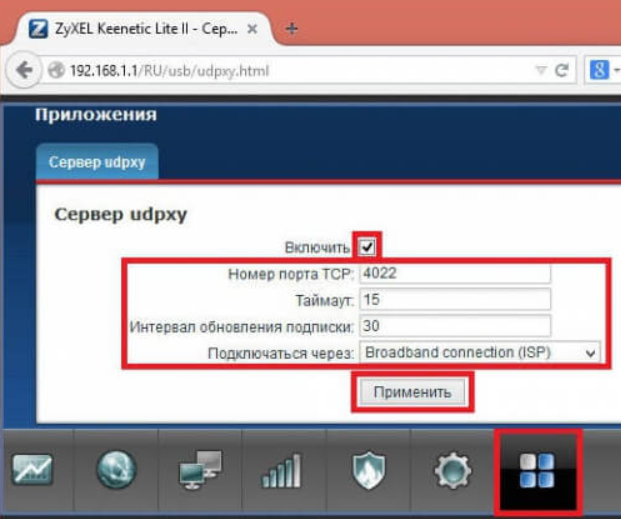
- 6. From the bottom of the panel in the menu, click on the “Applications” item, and they’re already on the picture with squares or the “Home Network — Computers” item. In the new window, activate «Enable UPDXY Server». We put down the necessary values in “Port Number, TimeOut, Signature Interval”. In the communication channels, select Broadband Connection. In the end, use the corresponding button.